Learn how to create professional digital vCards with QR codes on LNQKIT. Step-by-step guide to generate branded business cards that save to phone contacts automatically. Track every scan.
How to Create a vCard on LNQKIT: Digital Business Card QR Code Generator
Generate Digital Business Cards That Save Directly to Phone Contacts
Creating a professional vCard (digital business card) on LNQKIT takes minutes. This guide walks you through every step—from logging in through customizing your vCard QR code.
Table of Contents
- What is a vCard on LNQKIT?
- Getting Started: Log Into Your Account
- Navigate to vCard Links in Dashboard
- Create Your First vCard: Step-by-Step
- Customize Your vCard Information
- Generate Your vCard QR Code
- Share & Track Your vCard
- Managing Multiple vCards
- Best Practices for vCard Success
- FAQ: Common vCard Questions
What is a vCard on LNQKIT? {#what-is-vcard}
A vCard is a digital contact card that stores your professional information in a format every smartphone recognizes. When someone scans your vCard QR code, their phone automatically opens the Contacts app with your information pre-populated.
What information can you include?
- Full name (first and last)
- Email address
- Phone numbers
- Job title and company
- Website URL
- Physical address (street, city, ZIP, region, country)
- Professional photo/avatar
- Birthday
- Personal notes
- Social media links (expanded options available)
Why use LNQKIT's vCard?
- Branded QR codes - Customize colors, add your logo, choose unique shapes
- Trackable links - See every scan, when it happened, what device scanned it
- Short URL - Custom branded links (e.g., lnqkit.com/your-name)
- No expiration - Your vCard remains active indefinitely
- Easy updates - Change information anytime without regenerating codes
- Integrated dashboard - Manage all your links from one place
Getting Started: Log Into Your LNQKIT Account {#login}
Step 1: Create or Access Your LNQKIT Account
- Visit LNQKIT.com
- Click "Sign Up" (if new) or "Login" (if existing)
- Enter your email address
- Create a password or use OAuth (Google, GitHub, etc.)
- Verify your email address if required
- You're now logged in
Step 2: What You'll See on Login
After logging in, you're directed to your LNQKIT Dashboard — your central hub for managing all your digital links, including:
- Bio link pages - Create your main bio page
- Shortened links - Create trackable short URLs
- File links - Host and distribute files
- vCard links - Digital business cards (what we're focusing on)
- Event links - Create calendar event sharing
- Static sites - Host HTML websites
- QR codes - Generate branded QR codes
- Links statistics - Track all your link performance
- Custom domains - Use your own domain
- Pixels - Integrate tracking pixels
- Projects - Organize links by campaign
- Splash pages - Create countdown pages
- Notification handlers - Get alerts on link activity
- Data - View collected form submissions
- Directory - Discover other creators
Navigate to vCard Links in Dashboard {#dashboard}
Step 3: Access the vCard Section
- After logging in, look at the left sidebar menu
- Find and click "Vcard links" (or "File links" then navigate to vCard section)
- You're now in the vCard management area
What You'll See in the vCard Section
vCard Links Dashboard shows:
- List of existing vCards - All your previously created vCards
- Search and filter options - Find specific vCards quickly
- "Create new vCard" button - Start creating a new digital business card
- Statistics - View scan counts and engagement metrics
- Edit/delete options - Manage existing vCards
Message if empty: "No filtered data found" or "No matches found for your filter" appears if you haven't created any vCards yet. This is normal—click the create button to build your first vCard.
Create Your First vCard: Step-by-Step {#create-vcard}
Step 4: Click "Create vCard"
In the vCard links section, click the "Create vCard" or "Add New vCard" button.
A modal dialog appears with the initial vCard creation form.
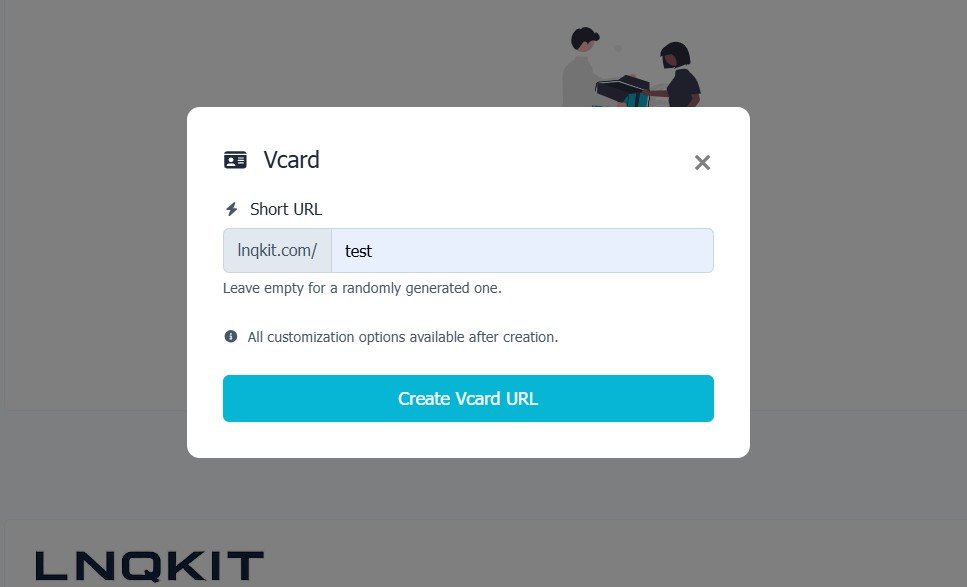
Step 5: Initial vCard Setup (Modal Form)
You'll see this form:
vCard (header)
Short URL
- Input field with prefix:
lnqkit.com/ - Enter your custom handle (e.g., "john-smith" creates lnqkit.com/john-smith)
- Leave empty for a randomly generated one
Important note: "All customization options available after creation."
This means: Complete this basic setup, create the vCard, then access full customization on the next screen.
Step 6: Click "Create vCard URL"
Once you've entered (or left blank for random) your short URL, click the blue "Create vCard URL" button.
LNQKIT generates your vCard and takes you to the vCard Settings page where full customization awaits.
Customize Your vCard Information {#customize}
Step 7: You're Now in vCard Settings
After creation, you land on the vCard settings page. The breadcrumb shows: Links > Vcard link Settings
At the top, you see: "Your link is lnqkit.com/[your-custom-url]"
Step 8: Fill in Your Contact Information
The settings form includes these fields:
Short URL Section
lnqkit.com/+ your custom handle- Change anytime without regenerating codes
Avatar
- Upload your professional photo
- Accepted formats: .png, .jpg, .jpeg
- Maximum file size: 0.75 MB
- Pro tip: Use a headshot or professional logo
Personal Information
- First name - Your first name
- Last name - Your last name
- Email - Your professional email address
- Phone numbers - Expandable section (add multiple numbers)
Professional Information
- Website URL - Your portfolio, blog, or company website
- Company - Your organization name
- Job title - Your professional title
Location Information
- Street address - Your business address (optional)
- City - City of your business location
- ZIP - Postal code
- Region - State/province
- Country - Your country
Additional Information
- Birthday - Date in dd/mm/yyyy format (optional)
- Note - Personal or professional note (optional)
Expandable Sections (scroll down for these):
- Phone numbers - Add multiple phone numbers with labels
- Socials - Add social media profiles (LinkedIn, Twitter, Instagram, etc.)
- Pixels - Integrate tracking pixels for conversions
- Temporary URL - Schedule when vCard is active
- Protection - Password protect your vCard (optional)
- Advanced - Additional customization options
Step 9: Fill in All Relevant Information
Complete as many fields as applicable to your situation. Minimum required:
- First name
- At least one contact method (phone or email)
Best practice: Include:
- Professional photo (builds trust)
- Email and phone (multiple contact options)
- Website or portfolio link
- Job title and company (credibility)
- Social media profiles (networking)
Step 10: Click "Update"
After filling in all your information, scroll to the bottom and click the blue "Update" button.
LNQKIT saves your vCard and generates your QR code based on the information you provided.
Generate Your vCard QR Code {#generate-qr}
Step 11: Access Your vCard QR Code
After updating, LNQKIT generates a unique QR code containing all your vCard information.
Your QR code includes:
- All contact information you provided
- vCard format that works on all smartphones
- Branded design matching your LNQKIT account
- Tracking capability (you see every scan)
Step 12: Customize Your QR Code Appearance
In the vCard settings, navigate to the customization section to:
- Change colors - Match your brand identity
- Add your logo - Embed your business logo
- Choose shapes - Select from unique QR code styles
- Add frame text - Frame with "Scan to save contact"
- Adjust size - Make it larger for print materials
Step 13: Download Your vCard QR Code
Click "Download" or "Export" to get your QR code in:
- PNG format - Best for digital use
- SVG format - Best for printing (scales infinitely)
- High resolution - Perfect for printing
Share & Track Your vCard {#share}
Step 14: Share Your vCard Everywhere
Now that your vCard is created, share it through:
Digital Channels:
- Email signature - Embed the QR code in every email
- LinkedIn profile - Add to your profile summary
- Instagram bio - Link directly in your bio
- Website - Feature on your contact page
- Business cards - Print hybrid cards with QR code on back
- Text messages - Send the link to contacts
Physical Distribution:
- Business cards - Print with your QR code
- Event materials - Brochures, flyers, banners
- Signage - Display in your office or storefront
- Apparel - Print on shirts or uniforms
Step 15: Track Every vCard Scan
LNQKIT's analytics dashboard shows:
Scan Metrics:
- Total number of scans
- When each scan occurred
- Device type (iOS, Android, desktop)
- Geographic location of scanner
- Which channel generated most scans
Use this data to:
- See which networking events generate contact captures
- Identify most effective distribution channels
- Understand who's actually using your vCard
- Optimize future networking efforts
Managing Multiple vCards {#manage-multiple}
Creating vCards for Different Purposes
LNQKIT lets you create multiple vCards for different contexts:
Example strategy:
- Personal vCard - lnqkit.com/john-smith
- Personal contact information
- Social media profiles
- Professional vCard - lnqkit.com/john-smith-cto
- Company contact details
- Professional phone/email
- Company website
- Event-Specific vCard - lnqkit.com/techconf-2025
- Same information as professional
- Track which conferences generate most interest
- Team vCard - lnqkit.com/your-company
- Company main contact
- General inquiry information
How to Create Multiple vCards
- In the vCard section, click "Create vCard" again
- Enter a different short URL
- Fill in different information as needed
- All vCards are tracked separately
- See which version generates most engagement
Best Practices for vCard Success {#best-practices}
Design Best Practices
Avatar/Photo:
- Use professional headshot (builds immediate credibility)
- Ensure good lighting and clear face visibility
- Save as .jpg for best compression
- Keep file under 0.75 MB
Short URL (Custom Handle):
- Keep it short and memorable (lnqkit.com/john is better than lnqkit.com/john-michael-smith-professional)
- Use your name or brand name
- Avoid special characters
- Makes it easy to verbally share
Contact Information:
- Include all primary ways to reach you
- Email and phone are minimum
- Add website to direct to more information
- Include location for local business context
Distribution Best Practices
For Networking Events:
- Print business cards with vCard QR code on back
- Have them easily accessible
- Mention "You can save my contact by scanning the back"
- Create event-specific vCard to track engagement
For Email Signatures:
- Embed your vCard QR code
- Add caption: "Scan to save contact"
- Includes link to your vCard URL
- Works across all email platforms
For Social Media:
- Add QR code image to Instagram profile
- Use in bio links
- Include in post captions
- Share in Stories with tracking
For Physical Locations:
- Display near entry/reception
- Print with "Scan to save our contact"
- Place in checkout areas
- Include in waiting room materials
Tracking Best Practices
Monitor Your Analytics Weekly:
- Review scan volume and trends
- Identify which channels drive most engagement
- See geographic distribution of scans
- Understand peak times when people scan
A/B Test Multiple vCards:
- Create variations for different channels
- Compare which contexts generate most scans
- Use data to refine distribution strategy
- Focus effort on highest-performing channels
Update Regularly:
- Change information immediately if contact details change
- All existing vCard QR codes automatically reflect updates
- No reprinting needed for updates
- Keep information current and accurate
FAQ: Common vCard Questions {#faq}
How Do I Know If My vCard Works?
After creating, click your vCard link. You should see:
- Your vCard loads in browser
- Option to "Add to Contacts" appears
- Your information displays correctly
- All links are clickable
Can I Change My vCard Information After Creating It?
Yes. Update any information anytime:
- Go to vCard settings
- Edit any field
- Click "Update"
- All existing QR codes automatically reflect changes
- No regeneration needed
What If I Change My Phone Number or Email?
Update it immediately in your vCard settings. All QR codes (printed, digital, everywhere) automatically reflect the new information. This is why dynamic vCards are superior to static codes—they update universally without reprinting.
Can I Delete a vCard?
Yes. In the vCard list, select your vCard and click delete. However, if you've distributed the QR code widely, consider deactivating instead of deleting to preserve scan history.
How Many vCards Can I Create?
LNQKIT allows unlimited vCard creation (based on your plan). Create as many as you need for different purposes.
Can I Embed My Photo in the vCard?
Yes. Upload your avatar/photo in the Avatar section. It displays when someone scans your vCard and gets added to their Contacts app.
Does My vCard Expire?
No. Your LNQKIT vCard never expires. As long as your account is active, your vCard remains functional indefinitely. There's no time limit on how long a vCard works.
Can I Use My Own Domain Instead of lnqkit.com?
Yes. If you have LNQKIT's custom domains feature enabled, you can point your own domain to your vCard. Contact LNQKIT support for custom domain setup.
How Do People Scan My vCard?
- They point their phone's camera at your QR code
- A prompt appears to open the QR code
- Their Contacts app opens with your information
- They tap "Add Contact" to save you
- Process takes 3 seconds
Can I See Who Scanned My vCard?
LNQKIT's analytics show:
- Total number of scans
- When scans occurred
- What device type
- General location
You can't identify specific individuals, but you see patterns of when and where your vCard is being scanned.
What Information Is Required?
Minimum required:
- First name (or company name)
- At least one contact method (email or phone)
All other fields are optional but recommended for maximum usefulness.
Can I Add Social Media Links?
Yes. Expand the "Socials" section to add:
- Twitter/X
- TikTok
- YouTube
- Other social platforms
Next Steps: Maximize Your vCard Strategy
Your vCard is now created and ready to share. Here's how to get maximum value:
- Print hybrid business cards - Traditional card + vCard QR code on back
- Add to email signature - Every email becomes a contact capture opportunity
- Share on social media - Direct followers to scan
- Monitor analytics weekly - See which channels drive engagement
- Update information regularly - Keep contact details current
- Create multiple vCards - Test different channels and contexts
- Integrate with other tools - Link from your bio link pages, short URLs, etc.
Get Support
Need help? Contact LNQKIT support:
- Email: info@lnqkit.com
- In-app chat: Available in your dashboard
- Knowledge base: Explore additional guides and tutorials
Final Thoughts
Your LNQKIT vCard transforms how you exchange contact information. No more fumbling with paper cards that get lost. No more manual typing of information. One scan and you're saved to someone's phone contacts.
By combining branded QR codes, comprehensive contact information, and tracking analytics, you've built a professional contact capture system that works 24/7.
Start networking smarter with your LNQKIT vCard today.